- enlarged -
Logic Audio Platinum 5.4.0
- enlarged - |
Logic Audio Platinum 5.4.0 is Emagic's [1] powerful 24bit/96kHz recording solution. The software was presented as the first professional Audio-/MIDI-sequencer running under Mac OS X. This text guides you through the initial setup process and explains some of the major recording functions of the software. Other Mac OS X compatible versions of the Logic software have a very similar setup so you can also refer to the contents of this article if you use one of the other versions.
Audio configuration
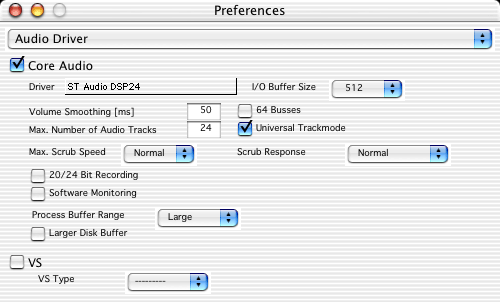
It is strongly recommended to use Logic Audio Platinum 5.4.0 (or later) under OS X 10.2 (or later). Make sure to install the current Mac OS X driver for your ST Audio DSP24 card on your system. Logic will then use the CoreAudio functions of the driver to access the audiohardware.
 Launch
Logic. After the software has been loaded, call Audio > Audio Hardware
& Drivers from the menu. The dialog that is displayed on the left will
appear now.
Launch
Logic. After the software has been loaded, call Audio > Audio Hardware
& Drivers from the menu. The dialog that is displayed on the left will
appear now.
Make sure Core Audio is checked. In the Driver selection box, you can select the driver. Please select your ST Audio card here (usually ST Audio DSP24). By default, Logic works with 16bit recording and playback resolution which is OK for normal home recording. If you want to use 24bit resolution, make sure to check the box 20/24 Bit Recording. Just next to Driver you can select the I/O Buffer Size in samples per seconds. If you select a larger number, the latency of the output will be higher. If you select a lower number, the latency will be lower. You might notice the latency when you change some setting inside Logic (e.g. you change a setting inside the Logic mixer or you use a virtual instrument): the result of your action will be audible with a certain delay, the latency. You have to keep in mind that a smaller latency also increases the system utilization and might have some influence on the performance (of course very much depending on the performance of your Mac). For the start, it's safe to select the default value of 512. This will result in a latency of around 12ms at 44.1kHz - a value which is easily acceptable for normal harddisk recording. You can try different settings later.
 User
interface
User
interface
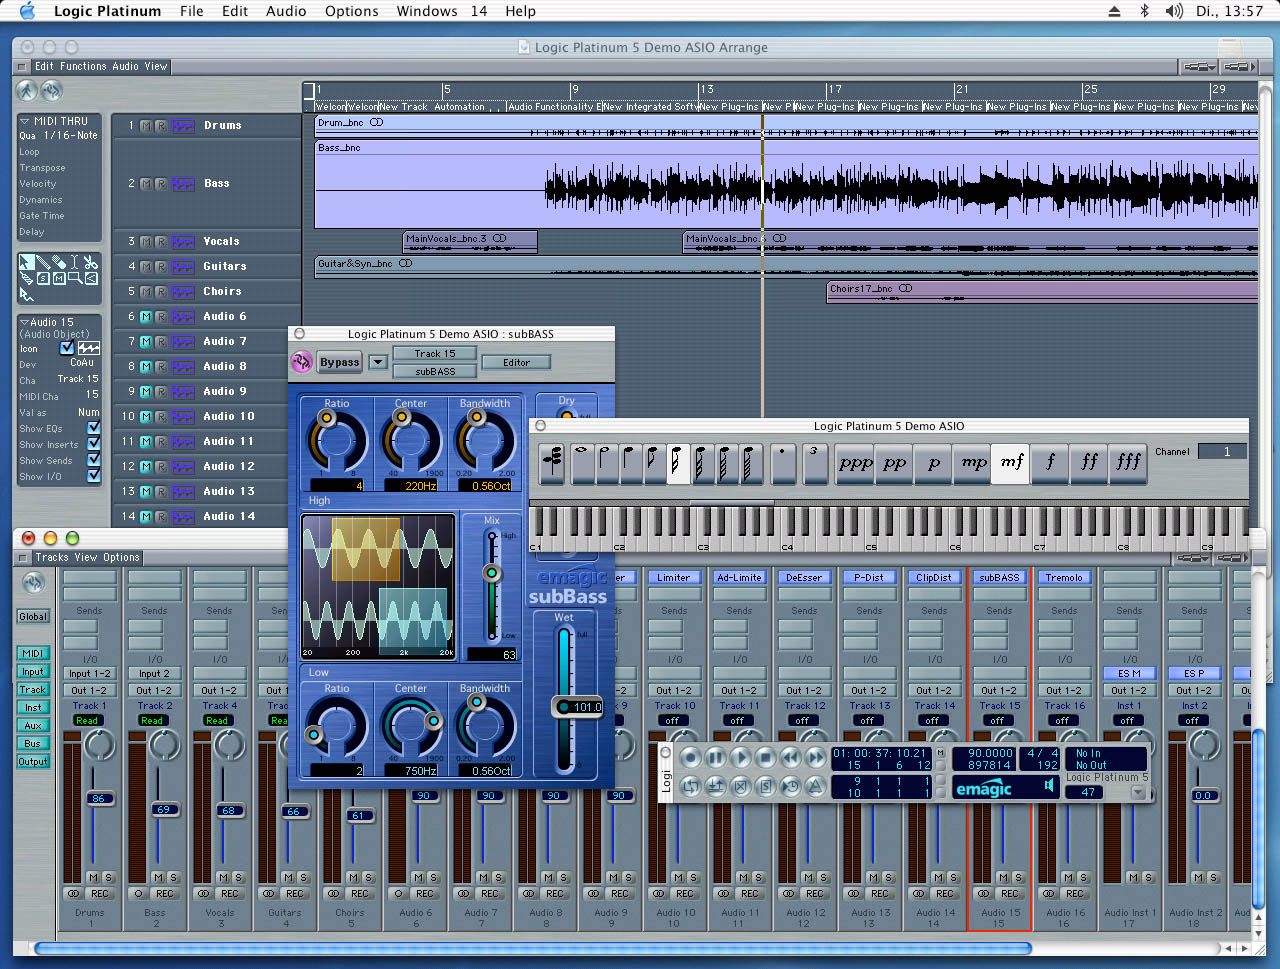
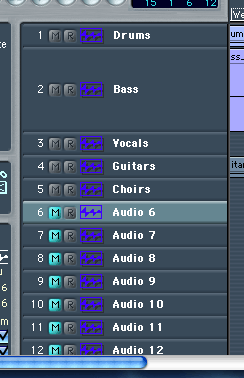
By default, Logic Audio Platinum 5.4.0 displays the arrangement window. The audio tracks in your project are listed in the left section of the window. You can change the default names (Audio 1, Audio 2, ...) of the tracks of course (the picture shows that the first track has been renamed to Drums, the second to Bass, etc.). Left of the name you can mute tracks with the M button and activate tracks for recording using the R button if needed. Via the menu of Logic, you can add and remove tracks to your project. The right section shows the parts with the actual audio data of your project. The arrangement window will also show the MIDI tracks (if you work with MIDI).

The Transport window controls functions for playback and recording and also shows informations about the current position in the arrangement, the metronome, etc. You can get more informations on all the functions inside the arrangement window and the Transport dialog in your Logic manual.
 Mixer
Mixer
For multitrack recording, it is important to assign the in- and outputs to the audiotracks of your arrangement. In Logic this is usually done via the mixer. Select the menu entry Windows > Open Mixer to see the mixer. All the channels you have in your arrangement will be displayed in the mixer in the same order (from left to right in the mixer, downwards in the arrange window).
The picture on the left shows you one audio channel in the mixer. The OO or O button in the lower right corner allows you to select if you want to record in mono or in stereo on this channel. This picture shows a stereo track. The REC button allows you to activate the channel for recording. Above that you can either mute (M) the track or play it solo (S). The main volume fader is under the controller for the balance, right to the level meter display.
The output button allows you to select a stereo output pair of the driver (usually Out 1-2, Out 3-4, etc.) for this audiotrack. These channels are representing the physical output channels of your hardware (DSP24 / DSP24 MK II / DSP24 MEDIA 7.1) or the internal virtual channels (DSP24 Value). Above that, you can select the input channel (mono or stereo) in the I/O section.
The Bus 1 and Bus 2 controllers (Sends) allow you -if enabled- to route a certain amount of the signal to one of the available effect busses. Each effect bus can use effect plugins (reverb, delay, etc.). You can control the effect busses in the right section of the mixer (after the audiotracks). The Inserts section additionally allows you to use effect plugins as inserts for this specific track. The EQ section above that provides you full control to have filters on the audiotrack when enabled (not set to Thru).
You have the basically same functions available individually for each audiotrack in your arrangement. All tracks from the arrangement are represented inside the mixer with their own set of controls.
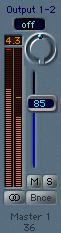 Also
accessable from inside the mixer window are the controls for the master output
signal (normally on the right section). The picture on the right displays the
output section for Output 1-2. You have control over the panning and
the volume for each physical output (for example, the S/PDIF output is available
as Output 9-10). The output can also be muted (M) or switched
to solo (S).
Also
accessable from inside the mixer window are the controls for the master output
signal (normally on the right section). The picture on the right displays the
output section for Output 1-2. You have control over the panning and
the volume for each physical output (for example, the S/PDIF output is available
as Output 9-10). The output can also be muted (M) or switched
to solo (S).
 Mixdown
/ Bounce
Mixdown
/ Bounce
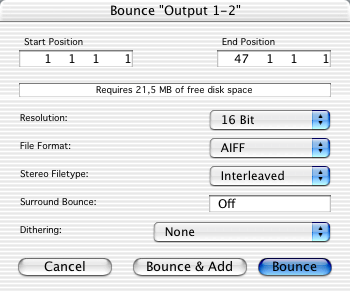
One of the most important steps in the process of digital recording with the your Mac is the mixdown. At some point, you want to create one stereo file that can be used as master for a CD, DAT, etc. - all versions of Locic allow you to perform this mixdown for all signals that are assigned to a specific output pair. This is done by clicking on the Bnce (Bounce) button.
The Bounce window (displayed on the left for Output 1-2) provides options to select the Start and End Position of the arrangement and allows you to choose the resulting Resolution (e.g. if you want to create a CD later, select 16 Bit, otherwise 24 Bit would give you a better quality).
The file that will be created (you can select the File Format) after you click on Bounce can be edited further in a sample editor software or transfered to a CD using a normal CD recording software. The file can also be used again inside Logic (via Bounce & Add). This allows you for example to mixdown some audiotracks with certain plugins that take a lot of CPU load. You can then use the CPU for other functions and use the mixed version to keep your mix while you mute the original audiotracks. All mixdowns that are generated via Bounce contain automatically all effect settings from the EQ, the loaded plugins, sound output of virtual instruments and also all volume settings you have selected in the mixer for all these elements.
|
|
last updated: 10/24/2002 author: Claus Riethmüller
|
|
| References to other documents or external websites |
|
[1]
Emagic website
- makers of the famous Logic Audio sequencing software
|
|
|