- enlarged -
Ableton Live
 - enlarged - |
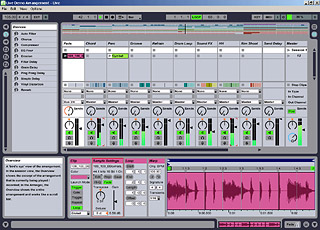
Live from Ableton [1] is the first audio sequencer that can be used or played like a musical instrument. It can be used intuitively live on stage and of course also at home or in the studio. Using the session view functionality of Live, you can directly improvise your music creation live. You can combine different audio material from different sources - the samples are adjusted to the tempo of your song in realtime without changing the pitch or sync. As Ableton Live is an excellent example of a crossplattform software (all major functions, user interface, etc. are the same), this article deals with both Windows and Mac OS X support of the software.
Initial setup for Windows
Ableton Live works under all Windows versions. It is using the ASIO drivers to access the audio hardware. Make sure to install a recent version driver for your DSP24 series card before you use the software.
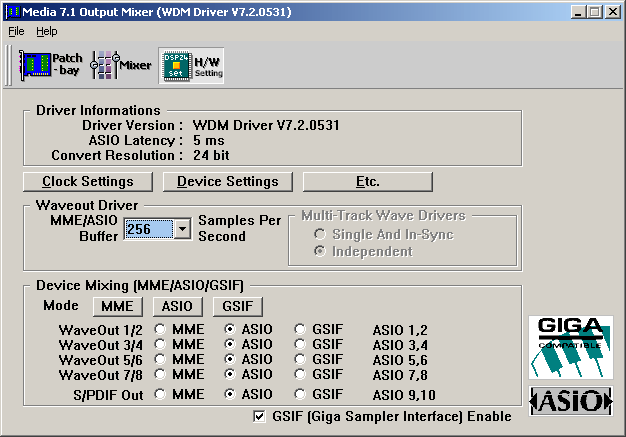
Before you use Ableton Live for the first time, some initial setup is needed: please open the Hardware Settings dialog [2] (via External Links if you have a DSP24 or DSP24 MK II or inside the Output Mixer on the DSP24 Value or DSP24 MEDIA 7.1). Under Device Setting, you can select the MME/ASIO Buffer size in samples per seconds. If you select a larger number, the latency of the output will be higher. If you select a lower number, the latency will be lower. The latency can be lowered to 5.5ms at 44.1kHz when the smallest recomended value (256) is selected. There are also smaller settings that could be used if you have a very fast PC system. You have to keep in mind that a smaller latency also increases the PC utilization and might have some influence on the performance (very much depending on your specific PC configuration).

For the start, it's safe to select the default value of 1024. If you have a faster system, you can even use 256. You can try different settings for your specific PC configuration later. Make sure that at least one output channel in the Device Mixing section has been assigned to ASIO. In the picture above, all output channels are assigned to ASIO (recommended).
If you use Windows 2000/XP, some settings are important when you are using Ableton Live: under Windows 2000, goto Control Panel > System > Advanced > Performance Options and select Background services. Under Windows XP, goto Control Panel > System > Advanced > Settings > Advanced > Processor scheduling and select Background services.
If you use Windows 9x/Me, you should also check some settings: make sure the 'auto-play' function for CD-ROMs is disabled. Goto Control Panel > System > Device Manager > CD-ROM and select Properties for all CD-ROM drives. Now disable Auto Insert Notification under Settings. DMA access for your IDE HDDs must be enabled as well. Goto Control Panel > System > Device Manager > Disk Drives and select Properties for each IDE-HDD you have installed (an entry is typically called GENERIC IDE DISK TYPExx). Now enable DMA under Settings.
Please do not use any other software that runs in the background when Ableton Live is used for a live performance. In the best possible setup, Live, Systray (the Windows taskbar) and External Links (or the Output Mixer) are the only active tasks.
Setup under Windows (ASIO)
 After
the buffers are configured and the recommended Windows settings have been made,
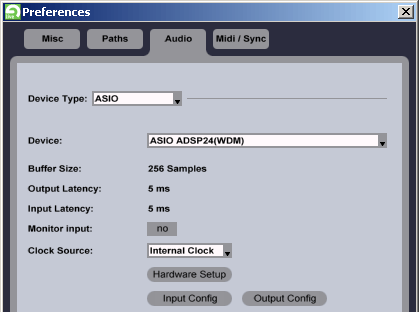
you can launch Live. After that, goto Options > Preferences > Audio
and the displayed window will apear. Only the top section is interesting for
the moment.
| • | select ASIO under Device Type: This allows you to use low latency via the ASIO 2,0 support of your DSP24 series hardware. |
| • | select the ASIO driver of your DSP24 series card under Device: (ASIO ADSP24). The resulting latency (depending on the buffer size that has been selected earlier in the Hardware Settings dialog [2]) will be displayed now below the driver selection box. If you want to change the latency, exit Live, change the ASIO/MME buffer size as explained above and then launch Live again. |
| • | check the Clock Source: setting: this should be set to Internal Clock unless you have connected any device to the digital input of your DSP24 series card that should supply the master clock. |
| • | you can enable and disable specific output and input channels of the ASIO driver via the Input Config and Output Config dialogs. |
| • | there is usually no reason to open the ASIO control panel via Hardware Setup. Please pre-configure the ASIO driver as explained above. |
Setup under Mac OS X (CoreAudio)
 Launch
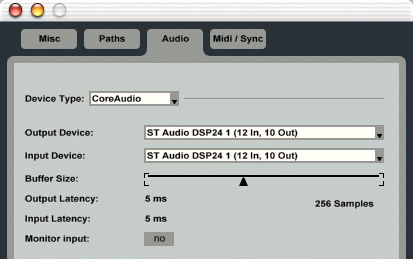
Live. Then goto Options >
Preferences > Audio and the displayed window will apear. Only the top
section is interesting for the moment (you might notice that it looks different
compared to the same section under Windows while most other parts of Live look
identical).
| • | select CoreAudio under Device Type: This makes sure you use the highquality CoreAudio support of the DSP24 series driver. |
| • | select the DSP24 device under both Output Device: and Input Device: (usually ST Audio DSP24). |
| • | You can select the Buffer Size: (which will affect the latency) now with the slider. If you select a larger number, the latency of the output will be higher. If you select a lower number, the latency will be lower. You have to keep in mind that a smaller latency also increases the system utilization and might have some influence on the performance (of course very much depending on the performance of your Mac). For the start, it's safe to select the default value of 512 on an older system or 256 on a faster G4 system. You can try different settings later if needed. |
Samplerate / Output Routing
 The
following settings are identical on the Mac and under Windows:
| • | under Sample Rate: you can set the samplerate you want to use. Keep in mind that a higher samplerate will increase the system load which could affect the performance. However, a higher samplerate will also decrease the latency. |
The Routing section in the audio preferences dialog allows you assign the physical output channels of your DSP24 series card to the Pre-Listen and Master channels of Live:
| • | by default you would use Bus 1/2 for Master. This means that the Master signal from Live will be played via output 1/2 of your DSP24 series card. Bus 3/4 would send out the signal via output 3/4, and so on. |
| • | the default setup for the Pre-Listen channel is Routed through Master which means that signals assigned to Pre-Listen inside Live will be sent out through the same output bus as the Master signal. |
Alternative example: if you have a DSP2000 C-Port, a DSP3000 M-Port or a DSP24 MEDIA 7.1 and you want to use the headphone output for the Pre-Listen signal, you would set Master to Bus 3/4 (and use outputs 3/4 for the master signal) and Pre-Listen to Bus 1/2, as the headphone output is paired with output 1/2 on these DSP24 systems.
When you click on the bus icon (the one that looks like an auto-bus) in the lower right corner of Live later, you will see the output levels of each physical and enabled output channel pair (bus). You can also control the levels there.
|
|
last updated: 11/11/2002 author: Claus Riethmüller
|
|
| References to other documents or external websites |
|
[1]
Ableton
website
- makers of the Live sequencer software
[2] The Hardware Settings dialog, ST Audio Knowledge Base |
|
|