- enlarged -
Cubase SL/SX
 - enlarged - |
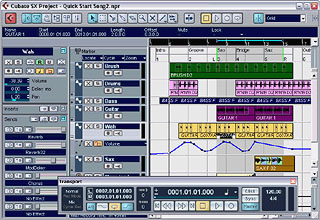
Cubase SX by Steinberg [1] is one of the most powerful Audio-/MIDI-sequencing applications available for Windows PCs today. Cubase SL is the smaller version of the same software that gives you nearly all functions from Cubase SX. This texts equally deals with both Cubase versions (SL / SX). You can use the software with our DSP24 series hardware for professional harddisk recording and for the integration of external and internal MIDI equipment into your recording system. With the VST technology by Steinberg, you can easily include virtual synthesizers as well as audio plugins in your arrangements.
Initial setup
Cubase SX/SL officially only works under Windows 2000 or XP although we could notice that the performance is better under Windows XP on most systems. Cubase SX/SL does not really support Windows 9x/Me. Make sure to install a recent version of our WDM driver for your DSP24 series card before you use the software. Before you use Cubase SX/SL, some initial setup is needed. First goto Control Panel > Sounds/Multimedia > Audio and select ADSP24 Int. Audio Device as prefered device for Playback. After that, please open the Hardware Settings dialog [2] (via External Links if you have a DSP24 or DSP24 MK II or inside the Output Mixer on the DSP24 Value or DSP24 MEDIA 7.1). Under Device Setting, you can select the MME/ASIO Buffer size in samples per seconds. If you select a larger number, the latency of the output will be higher. If you select a lower number, the latency will be lower. You will notice the latency when you are performing a realtime operation inside Cubase SX/SL like playing the voice of a VST instrument or assigning a VST effect to a live input audio signal. The result of your action will be audible with a certain delay, this is the latency. The latency can be lowered to 5.5ms at 44.1kHz when the smallest recomended value (256) is selected. There are also smaller settings that could be used if you have a very fast PC system. You have to keep in mind that a smaller latency also increases the PC utilization and might have some influence on the performance (very much depending on your specific PC configuration).
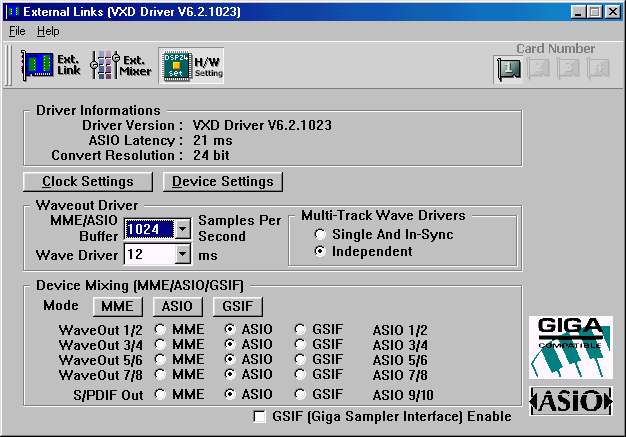
For the start, it's safe to select the default value of 1024. This will result in a latency of 21ms at 44.1kHz - a value which is acceptable for normal harddisk recording. You can try different settings for your specific PC configuration later.
Make sure that at least one output channel in the Device Mixing section has been assigned to ASIO. In the picture above, all output channels are assigned to ASIO (recommended).
Some Windows 2000/XP configuration parameters are important when you are using Cubase SX/SL. The following things should be checked: under Windows 2000, goto Control Panel > System > Advanced > Performance Options and select Background services. Under Windows XP, goto Control Panel > System > Advanced > Settings > Advanced > Processor scheduling and select Background services.
If you have some dropouts during playback or recording, you can increase the latency value (MME/ASIO Buffer). On a properly configured and faster system, you can safely use even the smallest recomended buffer value (256).
After the buffers are configured, you can launch Cubase SX/SL. When you start Cubase SX/SL for the first time, you might a message about the ASIO Multimedia driver sync test. There is no need to perform this test as the DSP24 series of cards have their own dedicated ASIO driver replacing Steinbergs ASIO Multimedia driver, also it only takes time. So please do not run the test if you are asked.
ASIO driver selection
When the software has been loaded, open Devices > Device Setup.... The dialog that is displayed below appear now.
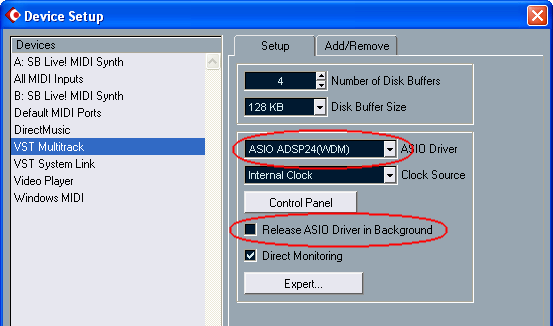
Click on VST Multitrack on the left side. Now you can select the ASIO driver on the right side in the ASIO Driver selection box. Select ASIO ADSP24(WDM). We also recommend to disable the Release ASIO Driver in Backround option below. If you have enabled Direct Monitoring as one the picture above, make sure that the External Mixer is not routed to Output 1/2 inside External Links if you use a DSP24, DSP24 MK II or a DSP24 ADAT. If you use a DSP24 MEDIA 7.1 or a DSP24 Value, do not connect the Mixer with Output 1/2 in the Output Mixer software.
Input channel assignment
After the initial driver setup has been made in Cubase SX/SL, you should assign and enable the input channels that you want to use. Open Devices > VST Inputs.
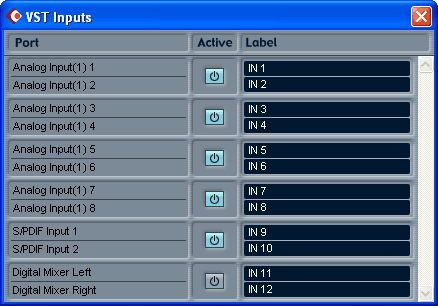
The switches in the Active column allow you to enable each stereo input channel pair. Normally you would use Input 1/2 only if you use a DSP24 Value or a DSP24 MEDIA 7.1. If you use a DSP24 or DSP24 MK II with an external box or a DSP24 ADAT, you can also enable more input channels. Channel 9/10 is used to record signals from the digital S/PDIF or AES/EBU input. Only enable this input when you are using it. Channel 11/12 allows you to record signals from the External Mixer of the hardware, e.g. to record signals from standalone applications such as GigaStudio into Cubase SX/SL. For normal operation you would not enable this channel pair. If you want to change the default names of the input channels, you can do so in the Label column.
After the inputs have been enabled, you can assign them to the audio tracks in your project. To do that, select an audio track (the picture below shows that the track Audio 01 has been selected). Now click on the in: selection box on the left side of the project window. A menu will appear that allows you to assign the specific mono input channel to this specific track. Only enabled input channels appear in this menu.
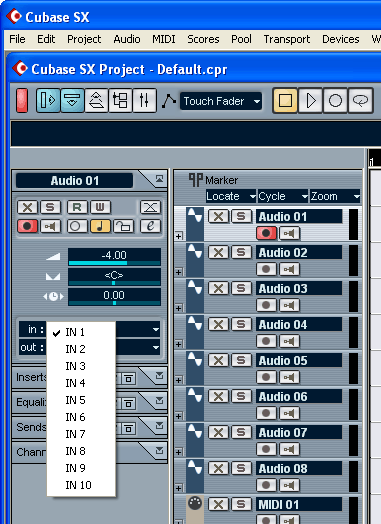
On a typical setup for basic multichannel recording you would assign IN 1 to Audio 01, IN 2 to Audio 02, etc. - keep in mind that you can always change the names of the tracks and the inputs if you want to. You can get more informations on input assignment in your Cubase SX documentation.
Output channel assignment
In pretty much the same way, you can also assign the output channels in Cubase SX. Open Devices > VST Outputs.
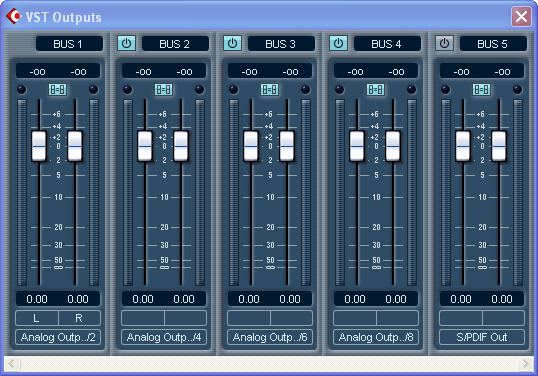
Cubase SX calls outputs, which are assigned in stereo channel pairs, by default BUS x. The first output pair (Output 1/2) is called BUS 1 by default. The second output pair (Output 3/4) is BUS 2 and so on. BUS 5 for example is output channel 9/10 which is the digital S/PDIF (or AES/EBU) output of your DSP24 series card. You can also change these default names if you like to. Additionally you can change the assignments of the buses to specific output channels by clicking on the selection box at the bottom of each bus channel strip. Normally there is no need to change the default assignments of busses to outputs however. An exception would be if you monitor your signals only via the digital output. If that is the case, assign S/PDIF Out to BUS 1 to hear the master signal from Cubase SX via the digital output of your DSP24 series card.
After the output busses have been enabled, you can assign them to the audio tracks in pretty much the same way as you assigned the input channels. To do that, select an audio track (the picture below shows that the track Audio 01 has been selected). Now click on the out: selection box on the left side of the project window. A menu will appear that allows you to assign the specific output bus to this specific track. Only enabled outputs will appear in the menu.
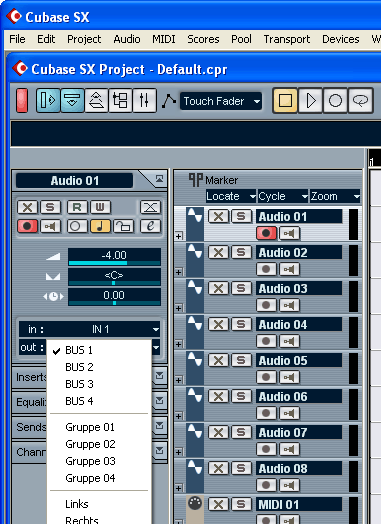
On most simple setups you would play all signals via BUS 1 only. You can use different output busses for example if you want to monitor another version of your mix via a separate output channel or if you want to use an external effect processor for all signals send out through a specific output bus. Please refer to the Cubase SX documentation to get more details about the usage of outputs in the software.
|
|
last updated: 08/25/2002 author: Claus Riethmüller
|
|
| References to other documents or external websites |
|
[1]
Steinberg
website
- makers of the famous Cubase audio software
[2] The Hardware Settings dialog, ST Audio Knowledge Base |
|
|