- enlarged -
Deck 3.5
- enlarged - |
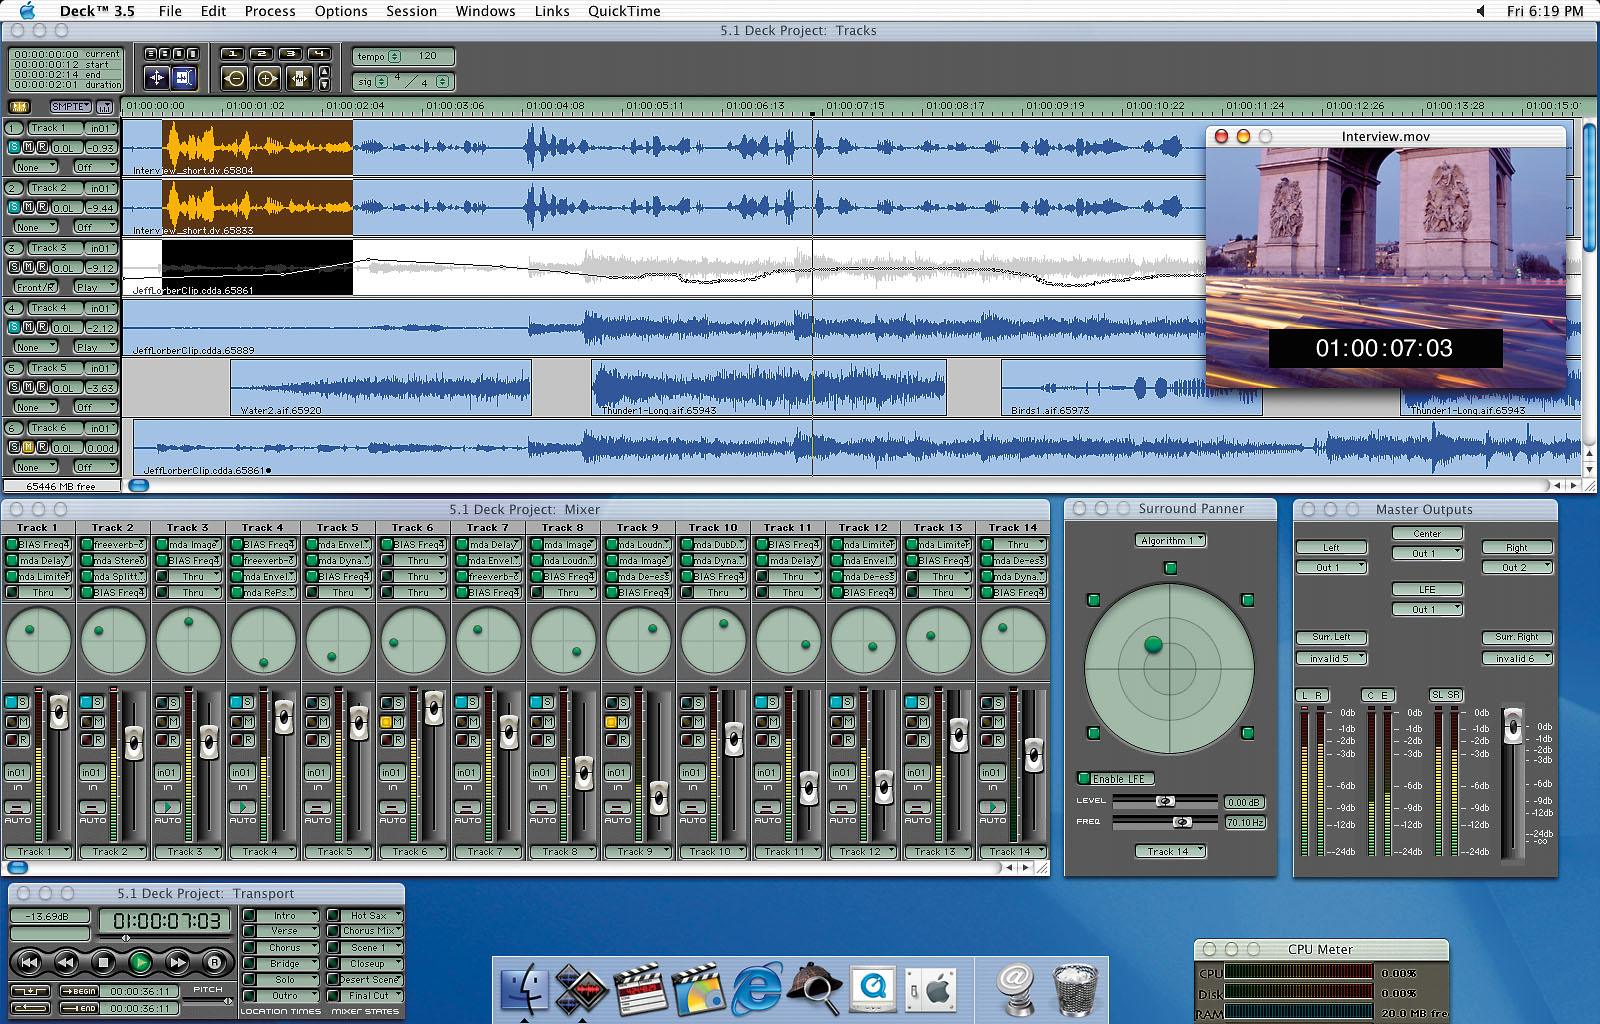
BIAS Deck 3.5 is one of the most powerful multchannel digital workstation programs for Mac OS X, especially for the area of audio for video. Deck is developed by BIAS [1] - the same guys that are pretty famous for the Peak stereo audio editor. This text guides you through the initial setup process and explains the configuration for some of the major recording functions of the software with the main focus on the creation of a 5.1 surround mix (one of Deck's most powerful functions).
Audio configuration
Please make sure that you are using a current revision of Deck for your version of Mac OS X. For example, if you use Mac OS X 10.2 (Jaguar), you should use at least version 3.5.1 of Deck. Check the BIAS website [1] for further information. Of course the current Mac OS X driver for your ST Audio DSP24 card must be installed on your system.
 Launch
Deck. After the software has been loaded, open Options> Hardware
Options from the menu. The dialog that is displayed on the right will
appear now. In this dialog, make sure that Input Device is set to ST
Audio DSP24 1. Also the Output Device selection should be set
to ST Audio DSP24 1.
Launch
Deck. After the software has been loaded, open Options> Hardware
Options from the menu. The dialog that is displayed on the right will
appear now. In this dialog, make sure that Input Device is set to ST
Audio DSP24 1. Also the Output Device selection should be set
to ST Audio DSP24 1.
You can also select the Buffer Size in samples per seconds. If you select a larger number, the latency of the output will be higher. If you select a lower number, the latency will be lower. You might notice the latency when you change some setting inside Deck (e.g. you change a setting inside the mixer): the result of your action will be audible with a certain delay, the latency. You have to keep in mind that a smaller latency also increases the system utilization and might have some influence on the performance (of course very much depending on the performance of your Mac). For the start, it's safe to select the default value of 512. This will result in a latency of around 12ms at 44.1kHz - a value which is easily acceptable for normal harddisk recording. You can try different settings later. On an older system, you might want to start with 1024. Note that the actual latency is not very criticial in an application like Deck as you do not process signals from the line input of the audio hardware in realtime and as Deck does not work with virtual software instruments. Deck knows the latency you are working with so even with a higher value (that especially might increase performance on an older Macintosh system), the application will work fine.
The value of the Input Level slider does not matter.
 Input
channel assignment
Input
channel assignment
After you have made the intial setup as explained, you can start to assign the input channels to specific tracks inside Deck. First you have to create a new project (or open an existing one). Then you should go into the Mixer window. You do that by selecting Windows > Mixer from the menu in Deck (if the mixer is not already displayed in your current project).
Every track inside Deck can use one of the physical inputs of your DSP24 series card. As every track appears in a separate column inside the mixer, it is best to assign inputs in this window. Locate the In field (with in01 written in it by default) on the track column you want to use. Click the mouse button on it. A menu with all mono input channels will appear. Select the channel you want to use (e.g. In 1 for the analog input 1 on the hardware or In 9/In 10 for the S/PDIF input channels).
Alternativly, you can also assign input channels in the Tracks window. To do that, you would select Windows > Tracks in the Deck menu if the Tracks window is not already displayed. Every track has its In selection on the left side, similar (or better identical) to the Mixer window.
Later, when you are preparing for recording, you can "arm" each track for recording with the red R button. Deck will only record on tracks on which the R switch has been enabled.
 Output channel assignment
Deck allows you two operation modes. It can either work to create a stereo master or a 5.1 surround mix. You are selecting either one of the two options when you are creating a new project. In the "normal" stereo mode, you simply assign the output channels in the same way as explained above for the inputs. Open the Mixer window via Windows > Mixer and then you can select outputs for each specific track (e.g. Out 1 <-> Out 2 to use output 1/2 as a stereo output). You can change levels for the different outputs in the Master Outputs window (Windows > Master Outputs).
The look & feel of the Master Outputs window is different if you are in a 5.1 surround project (it looks like displayed on this picture on the left). If you are creating a 5.1 surround mix, you need to use 6 independand mono output channels for Front Left, Front Right, Rear/Surround Left, Rear/Surround Right, Center and Subwoofer/LFE. The DSP24 MEDIA 7.1 can be used perfectly for such a project as the card was developed with surround production in mind. Of course, other ST Audio products with more than 6 independand outputs like the DSP2000 C-Port or the DSP3000 M-Port can be used in a similar way.
To assign outputs in a 5.1 surround project, open the Master Outputs window via Windows > Master Outputs from the menu inside Deck if it is not displayed already. Under each of the six different speaker channels you can find a green field that shows which output is assigned to which speaker channel. By default, Out 1 is assigned to Left, Out 2 to Right, Out 3 to Surr.Left, Out 4 to Surr.Right, Out 5 to Center and Out 6 to LFE. You can keep this default setup as it is perfectly OK in most situations. Just make sure that your speakers are connected to the outputs of your audiohardware correctly (as defined in this setup). To change the output assignment anyway, click with the mouse on the specific field and select the physical output channel in the menu that will appear.
If you use a DSP24 MEDIA 7.1 you might want to change the default setup to match the channel assignment to the printing on the back panel of the breakout box. In this case you would assign Center to Out 3, LFE to Out 4, Surr.Left to Out 5 and Surr.Right to Out 6. Keep in mind that this is all a matter of definition and your personal setup ... you are not forced to use the channels based on the printing on the breakout box and you are not forced to use Deck's default assignments.
If you use a DSP24 Value, we recommend to create a normal stereo project rather than a 5.1 surround mix because of the number of physical output channels you have available on the card.
 Monitoring setup
To make sure that the hardware mixer on your DSP24 series card does not mix the independand output signals, you should double check the monitoring setup inside the DSP24 Settings utility [2]. To do that, launch the application and open the External Links section in it. For DAC Output 1+2, select HAL Out channel 1+2; for DAC Output 3+4, select HAL Out channel 3+4; for DAC Output 5+6, select HAL Out channel 5+6 and for DAC Output 7+8, select HAL Out channel 7+8. This allows you to use Output 1~8 directly from Deck to playback the surround signals directly without the digital mixer from the DSP24 hardware. The setup is visible on the right.
Surround mixing
If you are in a 5.1 surround project in Deck and if you have setup the application properly as explained in this article, you can now start to pan signals in the 5.1 surround room with Deck's Surround Panner. Open it via Windows > Surround Panner from the menu in Deck. For every track (you can select it at the lower section of the Surround Panner), you can independandly "move" the sound in the 5.1 room. You can even add effects generated by Deck and you can record the movements as non-destructive panning data (which can be edited later). There are not many easier ways to create 5.1 surround mixes!
QuickTime movies
Deck also allows you to do the complete editing in synchronisation to movie data. If you want to watch the movie while you are playing, moving and editing audiodata, goto Windows > QuickTime to open the movie window that displays always the correct position of the movie in all editing steps.
|
|
last updated: 04/01/2003 author: Claus Riethmüller
|
|
| References to other documents or external websites |
|
[1]
BIAS
website
- makers of the Deck multichannel audio workstation software and the
famous Peak audio editor
[2] DSP24 Settings utility for Mac OS X (DSP24, DSP2000 C-Port, DSP3000 M-Port), ST Audio Knowledge Base [1] DSP24 Value Settings utility for Mac OS X (DSP24 Value), ST Audio Knowledge Base [1] DSP24 MEDIA 7.1 Settings utility for Mac OS X (DSP24 MEDIA 7.1), ST Audio Knowledge Base |
|
|