- enlarged -
How to use External Links
Introduction
- enlarged - |
We sometimes get asked, why the user interface of the DSP24 ADAT looks "confusing" or is "hard to understand". This text will explain the function of the External Links software and shows that the usage of the software is actually much more simple as it might look initially.
External Links is the control center of the DSP24 ADAT card. It controls the monitoring of your PC based studio. Different studio envrionments (e.g. analog mixing desk vs. PC as digital mixer) require different monitoring setups. Sometimes you want to listen to the signal you are recording at the moment. Sometimes you want to listen to a modified version of the signal (e.g. processed by an effect processor) or you do want to listen to a completly different audio track while recording. This means that you need to be able to define what exactly is played through the separate output channels of your audiocard and External Links allows you to do that.
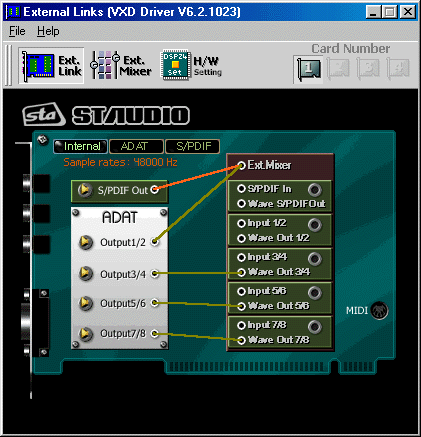
What is displayed by External Links?
The software is divided into two main sections. The output channels of the card are displayed on the left side of the window. The digital output (S/PDIF Out) and also the 8 channels of the optical ADAT output are displayed under the ADAT headline. The first output channel pair (Output 1,2) is automatically used as analog monitoring output. The right section symbolizes the I/O interface on the DSP24 ADAT card. The connectors on the left side (white circles) are the available sources for the outputs.
The virtual cables for the outputs (which mainly control the monitoring) cannot be removed but replaced by other connections. These connections are displayed as straight lines between the white circles. The available output sources are:
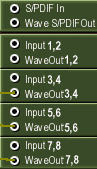
| - | S/PDIF In; the signal from the coaxial S/PDIF input of the card |
| - | Wave S/PDIF Out; the playback of the wave device ADSP24 S/PDIF Out (n) or channel 9/10 of the ASIO/GSIF driver |
| - | Input 1,2; the signal from channel 1/2 of the optical ADAT input |
| - | WaveOut 1,2; the playback of the wave device ADSP24 Ext. WaveOut 1/2 (n) or channel 1/2 of the ASIO/GSIF driver |
| - | Input 3,4; the signal from channel 3/4 of the optical ADAT input |
| - | WaveOut 3,4; the playback of the wave device ADSP24 Ext. WaveOut 3/4 (n) or channel 3/4 of the ASIO/GSIF driver |
| - | Input 5,6; the signal from channel 5/6 of the optical ADAT input |
| - | WaveOut 5,6; the playback of the wave device ADSP24 Ext. WaveOut 5/6 (n) or channel 5/6 of the ASIO/GSIF driver |
| - | Input 7,8; the signal from channel 7/8 of the optical ADAT input |
| - | WaveOut 7,8; the playback of the wave device ADSP24 Ext. WaveOut 7/8 (n) or channel 7/8 of the ASIO/GSIF driver |
All of these available signal sources can be connected to the outputs on the left side of the External Links window.
Monitoring
  |
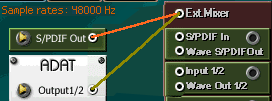
For each stereo channel pair it is possible to activate direct monitoring (without any latency). As in the example on these two pictures, you simply do it by connecting Input 1,2 to Output 1,2. This means that the signal from the ADAT input channel 1/2 is sent directly to the output channel 1/2 without any latency / delay. The signal you play inside your application via channel 1/2 is not audible now of course!
The second picture shows the alternative: if you connect WaveOut 1,2 with Output 1,2, the playback from your audio application is audible via the first output channel pair of the ADAT output. The signal from the input is not audible at the same time!
External Mixer
 The
limitation of these two options for monitoring (which is a limitation of many
pro audiocards) is that you cannot hear the input and output signal at the same
time. If you use an analog (or digital) mixer that is connected to both the
inputs and the outputs of the DSP24 ADAT card, you can monitor via the mixer
so that is no problem. The DSP24 hardware however has a built-in digital mixer
so you do not really need an external mixing desk. This function is called External
Mixer (easy to remember!) and as the input and playback signals, you can
connect it to Output 1,2 as shown on the picture.
The
limitation of these two options for monitoring (which is a limitation of many
pro audiocards) is that you cannot hear the input and output signal at the same
time. If you use an analog (or digital) mixer that is connected to both the
inputs and the outputs of the DSP24 ADAT card, you can monitor via the mixer
so that is no problem. The DSP24 hardware however has a built-in digital mixer
so you do not really need an external mixing desk. This function is called External
Mixer (easy to remember!) and as the input and playback signals, you can
connect it to Output 1,2 as shown on the picture.
If the External Mixer is connected to Output 1,2 (or alternativly to S/PDIF Out), all input and all playback signals are audible simultaneously via the first two channels of the ADAT output and the analog monitoring output (or alternativly via the coaxial S/PDIF output). When you open the External Mixer (just click on the Ext.Mixer button), you can set the volume for each playback and input channel independandly. This allows you to create your own mix completly digitally inside your PC without the need of external mixing equipment and without the need for special software from third parties. This final mix can even be digitally resampled using the ADSP24 (n) Digital Mixer MME wave device or channel 11/12 of the ASIO 2.0 driver.
Clock source selection
![]() The
three buttons in the upper left corner of External Links allow you to
select the clock source for the DSP24 ADAT card:
The
three buttons in the upper left corner of External Links allow you to
select the clock source for the DSP24 ADAT card:
| Internal | Select this (default) if the DSP24 ADAT should be the master clock source for all operations. All digital devices connected to the ADAT or S/PDIF output of the card need to work with external synchronisation in this case. |
| ADAT | Select this clock source when the device connected to the optical ADAT input should supply the clock / samplerate for the DSP24 ADAT card. |
| S/PDIF | Select this clock source when you want to record from the S/PDIF input with the clock supplied by the device connected to the coaxial digital input of the card. Please note that you cannot select S/PDIF as clock source and record from the ADAT input at the same time. |
Please note that it is very important that an active device is connected to the digital input (ADAT and/or S/PDIF) when the sync is set to external (ADAT and/or S/PDIF). It is not possible to record a clean signal from the digital input if you use internal synchronisation ... also it is not possible to playback and record clean signals (on any in- and output) if you use external synchronisation without anything connected to the digital input. In fact, on some systems it is not possible to record and playback at all with a wrong sync setting! It is important to use this setting very carefully. It can also be changed in the Hardware Settings [1] dialog.
|
|
last updated: 07/12/2002 author: Claus Riethmüller
|
|
| References to other documents or external websites |
|
[1]
The Hardware Settings dialog,
ST Audio Knowledge Base
|
|
|