- enlarged -
Tassman 2.1
 - enlarged - |
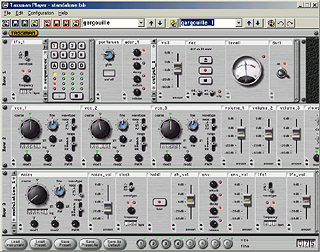
Applied Acoustics Systems [1] has developed one of the most fascinating software synthesizers available today: the Tassman modular physical modeling synthesizer allows you to create and use really unique sounds. The powerful synthesis technique used in the Tassman uses the laws of physics to reproduce the behavior of objects. The modular synthesizer solves, in real time, mathematical equations describing the function and characteristics of an object. Tassman is not using samples to create the sound: everything is calculated in realtime.
Tassman 2.1 can be used standalone (this article is describing the setup for that) or as a plugin in VST- or DXi-hosts such as Cubase VST [2] from Steinberg, Emagic Logic Audio [3] or Cakewalk SONAR [4]. If you use Tassman as a plugin, only the host-application needs to be configured for audio output.
Initial setup
Tassman 2.1 works under all Windows versions and is able to use ASIO drivers to access audio hardware (recomended). Make sure to install a recent version of the driver for your DSP24 series card before you use the software.
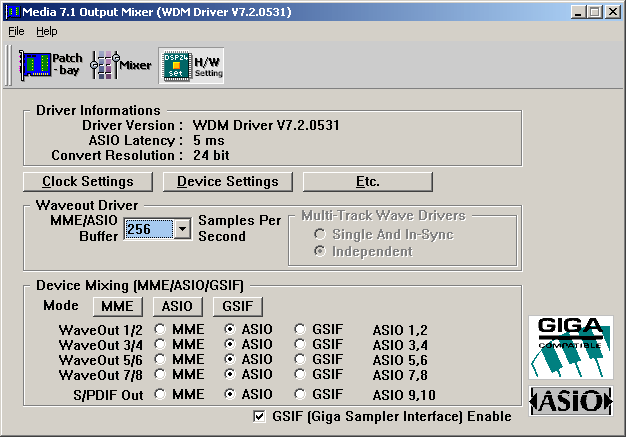
Before you use Tassman 2.1 for the first time, some initial setup is needed: please open the Hardware Settings dialog [5] (via External Links if you have a DSP24 or DSP24 MK II or inside the Output Mixer on the DSP24 Value or DSP24 MEDIA 7.1). Under Device Setting, you can select the MME/ASIO Buffer size in samples per seconds. If you select a larger number, the latency of the output will be higher. If you select a lower number, the latency will be lower. A low latency value is needed to be able to play sounds from the Tassman in realtime. The latency can be lowered to 5.5ms at 44.1kHz when the smallest recomended value (256) is selected. Under Windows 2000/XP, even smaller settings could be used. You might run into performance problems if you do not have a very fast PC system however. A smaller latency always increases the PC utilization and might have some influence on the performance of the Tassman (very much depending on your specific PC configuration).

For the start, it's safe to select a value of 512. You can try different settings for your specific PC configuration later. Make sure that at least one output channel in the Device Mixing section has been assigned to ASIO. In the picture above, all output channels are assigned to ASIO.
If you use Windows 2000/XP, some settings are important when you are using the Tassman: under Windows 2000, goto Control Panel > System > Advanced > Performance Options and select Background services. Under Windows XP, goto Control Panel > System > Advanced > Settings > Advanced > Processor scheduling and select Background services.
If you use Windows 9x/Me, you should also check some settings: make sure the 'auto-play' function for CD-ROMs is disabled. Goto Control Panel > System > Device Manager > CD-ROM and select Properties for all CD-ROM drives. Now disable Auto Insert Notification under Settings. DMA access for your IDE HDDs must be enabled as well. Goto Control Panel > System > Device Manager > Disk Drives and select Properties for each IDE-HDD you have installed (an entry is typically called GENERIC IDE DISK TYPExx). Now enable DMA under Settings.
Please do not use any other software that runs in the background when the Tassman is used as standalone application. In the best possible setup, Tassman, Systray (the Windows taskbar) and External Links (or the Output Mixer) are the only active tasks.
ASIO driver selection
 After
the buffers are configured and the recommended Windows settings have been made,
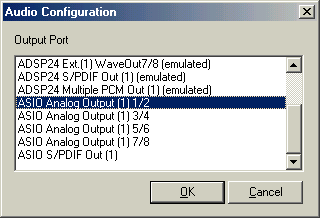
you can launch the Tassman. After that, goto Configuration > Audio...
and the displayed window will apear.
| • | Select one of the ASIO ... entries under Output Port. If you select ASIO Analog Output (1) 1/2 for example, Tassman will send out signals via output channel 1/2 of the ASIO driver. If you select ASIO S/PDIF Out (1), Tassman will send out its playback via the digital output channel. Note that Tassman 2.1 always generates a stereo signal. |
| • | Confirm your selection by clicking on OK. Now you can use the Tassman. |
| • | We strongly recommend not to change the latency (buffer size) via Configuration > Latency while Tassman 2.1 is still running. Please select the required latency as described above before you launch the Tassman. |
|
|
last updated: 07/13/2002 author: Claus Riethmüller
|
|
| References to other documents or external websites |
|
[1]
Applied
Acoustics Systems website
- makers of the Tassman modular synthesizer software
[2] Steinberg website - makers of the famous Cubase audio software [3] Emagic website - makers of the famous Logic Audio sequencing software [4] Cakewalk website - the website of Cakewalk / Twelve Tone Systems, Inc [5] The Hardware Settings dialog, ST Audio Knowledge Base |
|
|