- enlarged -
Traktor DJ Studio
- enlarged - |
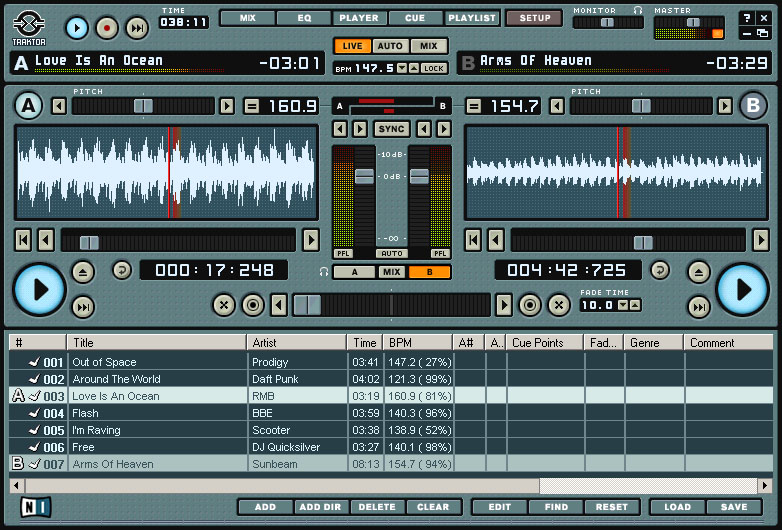
The Traktor DJ Studio by Native Instruments [1] is a professional DJ mixing software that integrates two independand players and many extremly useful functions like the beat matcher, a very nice digital scratcher or special filter effects.
To use the software in a professional envrionment, a multichannel audiocard with several separate and independand output channels is needed. This text describes the basic setup for the DSP24 series of cards (with an external box) for Traktor.
In this example, we will use a DSP2000 C-Port system to have a stereo monitor output (using the headphone output on the ADC&DAC2000) and a separate and independand stereo output for the main audio signal.
Of course the instructions are similar if you use a different external box with your DSP24 card. In a professional installation where Traktor will be combined with a normal DJ mixer (which will be used for headphone monitoring then), a DAC III would be a good choice.
Initial setup
 Before
we start with the setup of Traktor, we have to assign the output channels for
independand playback inside External Links [2].
In order to do that, please connect WaveOut 1,2 with Output 1,2
(this channel will be used for headphone monitoring) and WaveOut 3,4
to Output 3,4 (this will be used as output for the master playback).
This ensures that the two stereo signals are not mixed and sent directly to
the outputs, without changes in the volume or quality.
Before
we start with the setup of Traktor, we have to assign the output channels for
independand playback inside External Links [2].
In order to do that, please connect WaveOut 1,2 with Output 1,2
(this channel will be used for headphone monitoring) and WaveOut 3,4
to Output 3,4 (this will be used as output for the master playback).
This ensures that the two stereo signals are not mixed and sent directly to
the outputs, without changes in the volume or quality.
Now connect the headphones which we will use for monitoring to the headphone output on the ADC&DAC2000. Your amplifier with the speakers will be connected to Output 3 (left) and Output 4 (right) on the backside of the external box (1/4" TRS unbalanced).
Traktor setup
![]()
 Inside
Traktor, please click on Setup. the dialog that is displayed now is mainly
used to select the audio output device. Traktor provides several options for
audio playback (e.g. MME or DirectSound drivers, also DirectSound 3D support
for some consumer soundcards is available). The best choice -for both the audio
quality and the performance- is to use the ASIO 2.0 drivers of the DSP24. ASIO
2.0 support is available under Windows 9x/Me and under Windows 2000.
Inside
Traktor, please click on Setup. the dialog that is displayed now is mainly
used to select the audio output device. Traktor provides several options for
audio playback (e.g. MME or DirectSound drivers, also DirectSound 3D support
for some consumer soundcards is available). The best choice -for both the audio
quality and the performance- is to use the ASIO 2.0 drivers of the DSP24. ASIO
2.0 support is available under Windows 9x/Me and under Windows 2000.
Activate ASIO (lower right corner of the Setup dialog) and select ASIO ADSP24 in the Device selection box on the right. Make sure not to select any of the other output possibilites (e.g. Master out only; not displayed on this picture).
Now click on Setup to assign the different output channels of our hardware to the main and monitor outputs of Traktor.
 In
the dialog that apears now, you can define the channels for the Master
and the Monitor output. When you are using Traktor, you will be able
to play a track or a mix via the Master output (for the audience) while you
pre-listen to another track via the headphones on the Monitor channel. Inside
the software you can control the playback and the volume for each output channel
separatly.
In
the dialog that apears now, you can define the channels for the Master
and the Monitor output. When you are using Traktor, you will be able
to play a track or a mix via the Master output (for the audience) while you
pre-listen to another track via the headphones on the Monitor channel. Inside
the software you can control the playback and the volume for each output channel
separatly.
As we have connected the headphones to the headphone output of the ADC&DAC2000, we assign ASIO channel 01 to Monitor > Left (Mono) and ASIO channel 02 to Monitor > Right. If you would use a standard soundcard with just one stereo output, the signal would have to be mono only - using the ASIO drivers we can assign every mono channel independandly so this will give you a full stereo sound of the Monitor signal.
The Master output signal should be played via the physical Output 3 and 4 in our example. Please assign Master > Left (Mono) to ASIO channel 03 and Master > Right to ASIO channel 04.
If you would use a different output configuration (e.g. you want to play a signal via the digital output of the card, you can select different channels in this setup dialog.
Latency and performance
 If
you click on Card Control Panel, the Hardware Settings dialog
[3] of the DSP24 card
will apear. Under Device Setting, you can select the MME/ASIO Buffer
size in samples per seconds. If you select a larger number, the latency of the
output will be higher. If you select a lower number, the latency will be lower.
You might notice the latency when you change some setting inside Traktor (e.g.
you change a filter setting): the result of your action will be audible with
a certain delay: the latency. With the current drivers (v6.x for Windows 9x/Me),
the latency can be lowered to 5.5ms at 44.1kHz when the smallest recomended
value (256) is selected. You have to keep in mind that a smaller latency
also increases the PC utilization and might have some influence on the performance
(very much depending on the PC configuration).
If
you click on Card Control Panel, the Hardware Settings dialog
[3] of the DSP24 card
will apear. Under Device Setting, you can select the MME/ASIO Buffer
size in samples per seconds. If you select a larger number, the latency of the
output will be higher. If you select a lower number, the latency will be lower.
You might notice the latency when you change some setting inside Traktor (e.g.
you change a filter setting): the result of your action will be audible with
a certain delay: the latency. With the current drivers (v6.x for Windows 9x/Me),
the latency can be lowered to 5.5ms at 44.1kHz when the smallest recomended
value (256) is selected. You have to keep in mind that a smaller latency
also increases the PC utilization and might have some influence on the performance
(very much depending on the PC configuration).
For the start, we select the default value of 1024. This will result in a latency of 23ms at 44.1kHz - a value which is acceptable even for many realtime mixing situations. You can try different settings for your specific configuration later.
When using Traktor in a live setup, some operations on your PC might interrupt the playback ... and we do not want that. Because of that, some preparation of the PC is important. The following things should be checked in any installation of the software:
| • | Please do not use any other software that runs in the background when Traktor is used. In the best possible setup, Traktor, Systray (the Windows taskbar) and External Links are the only active tasks. |
| • | Prepare your playlist before you start your session if possible. When you copy larger or several files from CD-ROM or via a network while you play other files via Traktor, you migh experience small drop outs. |
| • | Make sure the 'auto-play' function for CD-ROMs is disabled. Goto Control Panel > System > Device Manager > CD-ROM and select Properties for all CD-ROM drives. Now disable Auto Insert Notification under Settings (Windows 9x/Me only). |
| • | DMA access for your IDE HDDs must be enabled. Goto Control Panel > System > Device Manager > Disk Drives and select Properties for each IDE-HDD you have installed (an entry is typically called GENERIC IDE DISK TYPExx). Now enable DMA under Settings (Windows 9x/Me only). |
| • | Under Windows 2000, goto Control Panel > System > Advanced > Performance Options and select Background services. Under Windows XP, goto Control Panel > System > Advanced > Settings > Advanced > Processor scheduling and select Background services. |
If you still have some dropouts, you can increase the latency value (MME/ASIO Buffer). On a properly configured and faster system, you can safely use smaller buffer values.
Master and Monitor out
 By
default, the output of Traktor is played via the Master output channel. In the
upper right corner of the Traktor window you can control the master output volume.
In our example, the Master signal is played via Output 3 / 4 on the backside
of the ADC&DAC2000.
By
default, the output of Traktor is played via the Master output channel. In the
upper right corner of the Traktor window you can control the master output volume.
In our example, the Master signal is played via Output 3 / 4 on the backside
of the ADC&DAC2000.
If you want to monitor a signal via the headphones, you can select either player A, the MIX or player B. This picture shows that the signal from player B is audible via the headphones. If you select MIX, both player signals are audible over the headphone. Last but not least: if you select A, you can listen to player A.
You can find more information on Traktor DJ Studio on the Native Instruments webpage [1] or in the manual of Traktor. Native Instruments also offers light versions and a demo version of the Traktor DJ Studio for download on their websites.
|
|
last updated: 07/12/2002 author: Claus Riethmüller
|
|
| References to other documents or external websites |
|
[1]
Native
Instruments website
- makers of Traktor DJ Studio
[2] How to use External Links, ST Audio Knowledge Base [3] The Hardware Settings dialog, ST Audio Knowledge Base |
|
|