- enlarged -
D-Vinyl SE
- enlarged - |
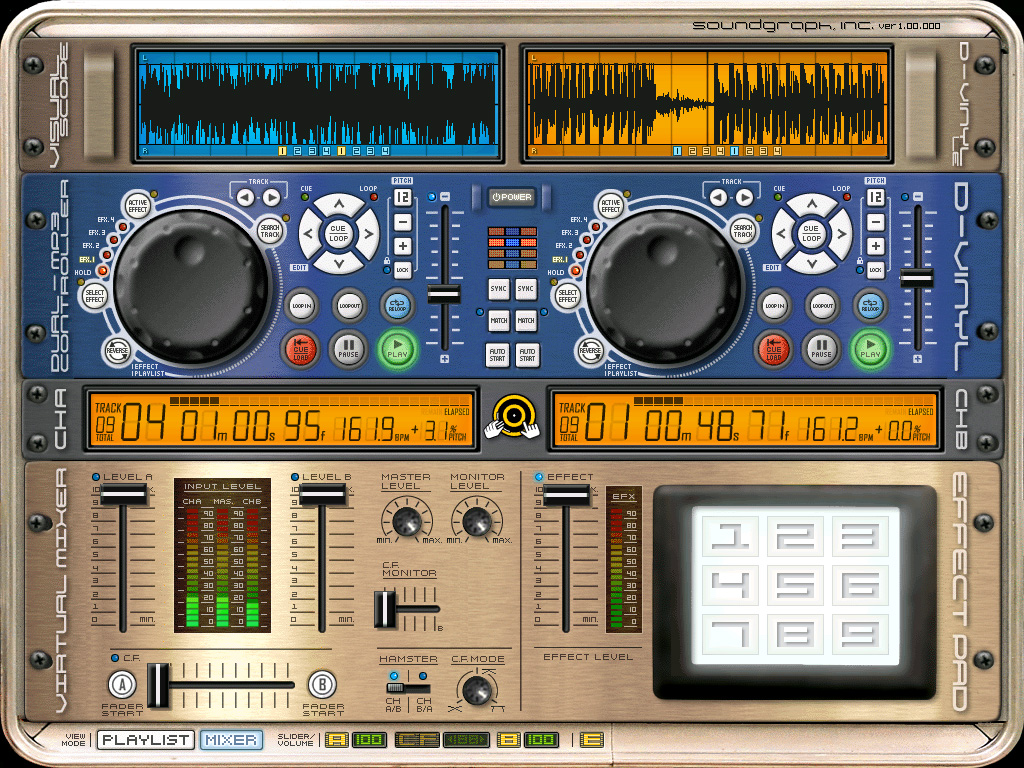
D-Vinyl SE is a very nice DJ mixing applications for MP3 songs developed by Soundgraph [1]. D-Vinyl SE is the comercial version without any limitations. There is also a program called D-Vinyl LE (Limited Edition) that is the free tryout version. It has the same features but displays a warning message every 20 minutes. Both programs provide two independand MP3 players, a sample player and a mixer. Probably the best feature is that the applications work with ASIO drivers to provide low latency and high stability.
Soundgraph also offers a version that is called D-Vinyl PAD. It has similar features than D-Vinyl SE but comes with an external hardware controller with a large touch pad to scratch MP3 files in realtime.
To use the software, audio hardware with independand output channels is recommended. This text describes the usage with a DSP2000 C-Port, a DSP3000 M-Port or a DSP24 MEDIA 7.1 card from ST Audio. In all three cases, the headphone output of the external box will be used for monitoring. While it works with a DSP24 Value as well, you will have only one analog stereo output when using the ASIO driver with D-Vinyl SE.
This text describes the basic setup for the DSP24 series of cards with D-Vinyl SE, D-Vinyl LE or D-Vinyl PAD. You can find more information on the D-Vinyl software on the Soundgraph webpage [1].
Output routing
Before we start with the setup of the D-Vinyl software, we have to assign the output channels for independand playback inside External Links [2] or the Output Mixer [3]. In order to do that, please connect WaveOut 1,2 with Output 1,2 (this channel will be used for headphone monitoring) and WaveOut 3,4 to Output 3,4 (this will be used as output for the master playback). This ensures that the two stereo signals are not mixed and sent directly to the outputs, without changes in the volume or quality. On the DSP24 Value, connect Output Mixer with Output 1/2.
Now you can connect the headphones that will be used for monitoring to the headphone output on your external box. Your amplifier with the speakers will be connected to Output 3 (left) and Output 4 (right) on the backside of the external box or to the RCA Output 1 (left) and Output 2 (right) if you use a DSP24 Value.
 D-Vinyl Setup
To perform the initial setup required to use the D-Vinyl software with your DSP24 card, you need to launch the D-Vinyl Playlist Editor. You should have its icon on your desktop or in the Programs menu after you installed the D-Vinyl software. You need to create playlists for the two decks (A and B) in D-Vinyl. If you have not done so, you might want to do that now.
Once you have created your playlists, click on Setup in the lower right corner. The window that is displayed on the right will appear.
The most important section for us is called Latency. It allows you to change the latency D-Vinyl works with on your system. Bascially you have to play around with the settings (System Performance and Total latency) until you get good settings for your system. On a typical Pentium 4 system with 1,5 GHz, the High selection as shown on this picture works perfectly without any drop-outs. If you have a slower or older system, you might have to change the settings.
The following settings are recomendations but not actually related to the usage with a DSP24 card:
Under General, we recommend to use waveform as Visual Scope display. This shows you a realtime waveform display while the MP3 files are played. Loop-points are displayed as well (the D-Vinyl software comes with an application called MP3 Editor that allows you to define loops inside MP3 files) in that case.
You might also want to set Playtype to continuous as displayed on the right to make sure that the next MP3 file inside the playlist is selected after the playback of the previous one has finished. If you want to continue to playback the same file again, select single.
The D-Vinyl software also provides an effect processor. Up to four effects can be used on either deck (A/B). Under Effect you can select the effects for each deck. The Sound Effect effect is a sample player that can play up to 10 .WAV files as one-shoot samples. You can replace the default files if you like.
 Once you are finished with
all basic setup parameters, click on Audio Device Setup. The window displayed on the
left will appear.
Once you are finished with
all basic setup parameters, click on Audio Device Setup. The window displayed on the
left will appear.
In this dialog, you can select the ASIO driver of the DSP24 series card. To do that, make sure the ASIO checkbox is selected and then select ASIO ADSP24(WDM) in the selection menu (Windows 2000/XP - under Windows 9x/Me the entry is called ASIO ADSP24).
If you want to change the buffer size / latency (MME/ASIO buffer), click on ASIO Control Panel to get to the H/W Settings dialog of External Links of the Output Mixer [2]. A good default value for most systems would be 512 ... on older systems you might want to increase the value to 1024.
As mentioned above, we plan to use the headphone output of your hardware for monitoring and output 3/4 as master output. To do that, select 2 x Stereo Channels under The Number and Type of Channel. For Separation Type, select Master Monitor. In this mode, the D-Vinyl software sends the output of the master mixer in the software to one stereo output (we use output 3/4) and the monitor signal for pre-listening to a separate output (the headphone out in our case).
To assign the output channels, select ASIO ADSP24(WDM)[2/3] for Output Device for Master and ASIO ADSP24(WDM)[0/1] for Output Device for Monitor. Please note that Soundgraph counts channel numbers in the D-Vinyl software beginning with 0 while we and most other vendors start with 1. So 2/3 means 3/4 and 0/1 means 1/2. Not too difficult ...
If you use a DSP24 Value card, you might want to use the 1 x Stereo Channel option without monitoring your signals. Or you could use the S/PDIF output as alternative secondary stereo output channel.
If you want to use an external DJ mixer and forget about the headphone output, you would select Ch.A Ch. B as Separation Type. The D-Vinyl software will send out the signals from deck A and deck B independandly directly to the different output channels.
When you are finished with your setup, click OK twice and then you can launch the D-Vinyl software for the first time (keep in mind that the playlists have to be created and assigned to deck A and B first).
![]() To
control the monitoring and playback volume, you can open the mixer of the D-Vinyl
software. Just click on the Mixer button in the View Mode section
in the lower right corner of the D-Vinyl software screen.
To
control the monitoring and playback volume, you can open the mixer of the D-Vinyl
software. Just click on the Mixer button in the View Mode section
in the lower right corner of the D-Vinyl software screen.
In the mixer section you have the typical controls of a DJ mixer including the level sliders for deck A and B, a crossfader, a master level knob, a knob to control the monitor level and a second crossfader for the monitor output. You can also adjust the volume of the effect section (for sample playback).
|
|
last updated: 04/05/2003 author: Claus Riethmüller
|
|
| References to other documents or external websites |
|
[1]
Soundgraph website
- makers of D-Vinyl SE, D-Vinyl LE and D-Vinyl PAD
[2] How to use External Links (DSP24, DSP24 MK II, DSP2000 C-Port, DSP3000 M-Port), ST Audio Knowledge Base [1] How to use External Links (DSP24 ADAT), ST Audio Knowledge Base [3] How to use the Output Mixer (DSP24 Value), ST Audio Knowledge Base [2] How to use the Output Mixer (DSP24 MEDIA 7.1), ST Audio Knowledge Base |
|
|